
5:17
With summer coming to a close, you may be looking for a way to pass the time before the school year starts. A great skill set and tool to learn is creating Custom Features with Onshape’s FeatureScript programming language.
Let’s take a look at how you can accelerate your design processes by integrating Custom Features and FeatureScript into your CAD workflow in the classroom.
Why Use FeatureScript in the Classroom?
Educators and students alike can make use of FeatureScript and Custom Features in order to reduce the time spent on a specific design task. In the classroom, this can be the difference between spending a whole week ensuring students are ready to start on a new lesson plan and hitting the ground running with an assignment.
Students working in teams will also benefit from using Custom Features in their workflow to really make their time count during those rushed design cycles when they’re getting ready for competitions.
In the webinar, “Using Custom Features in Onshape,” I shared how any Onshape user can create tools in FeatureScript to help streamline their design process by automating tasks such as data collection, or by simplifying repetitive steps into a one-click solution.
Getting Started with FeatureScript
FeatureScript is much like any other scripting or coding language and can be picked up easily by anyone that has prior programming experience. It is the tool that is used to create Custom Features. Even if you don’t know how to write or read code, Custom Features that have been developed by the ever-growing Onshape community can be imported into any Document in just a few steps.
If you’re ready to start writing your own Custom Features in FeatureScript, there are plenty of resources and courses to help you get started.
Let’s dive right into a few ways you can get started with using Custom Features and learning how to write FeatureScript yourself!
1. Importing Custom Features into Onshape
Adding a Custom Feature to your toolbar from an Onshape Document that has a Feature Studio.
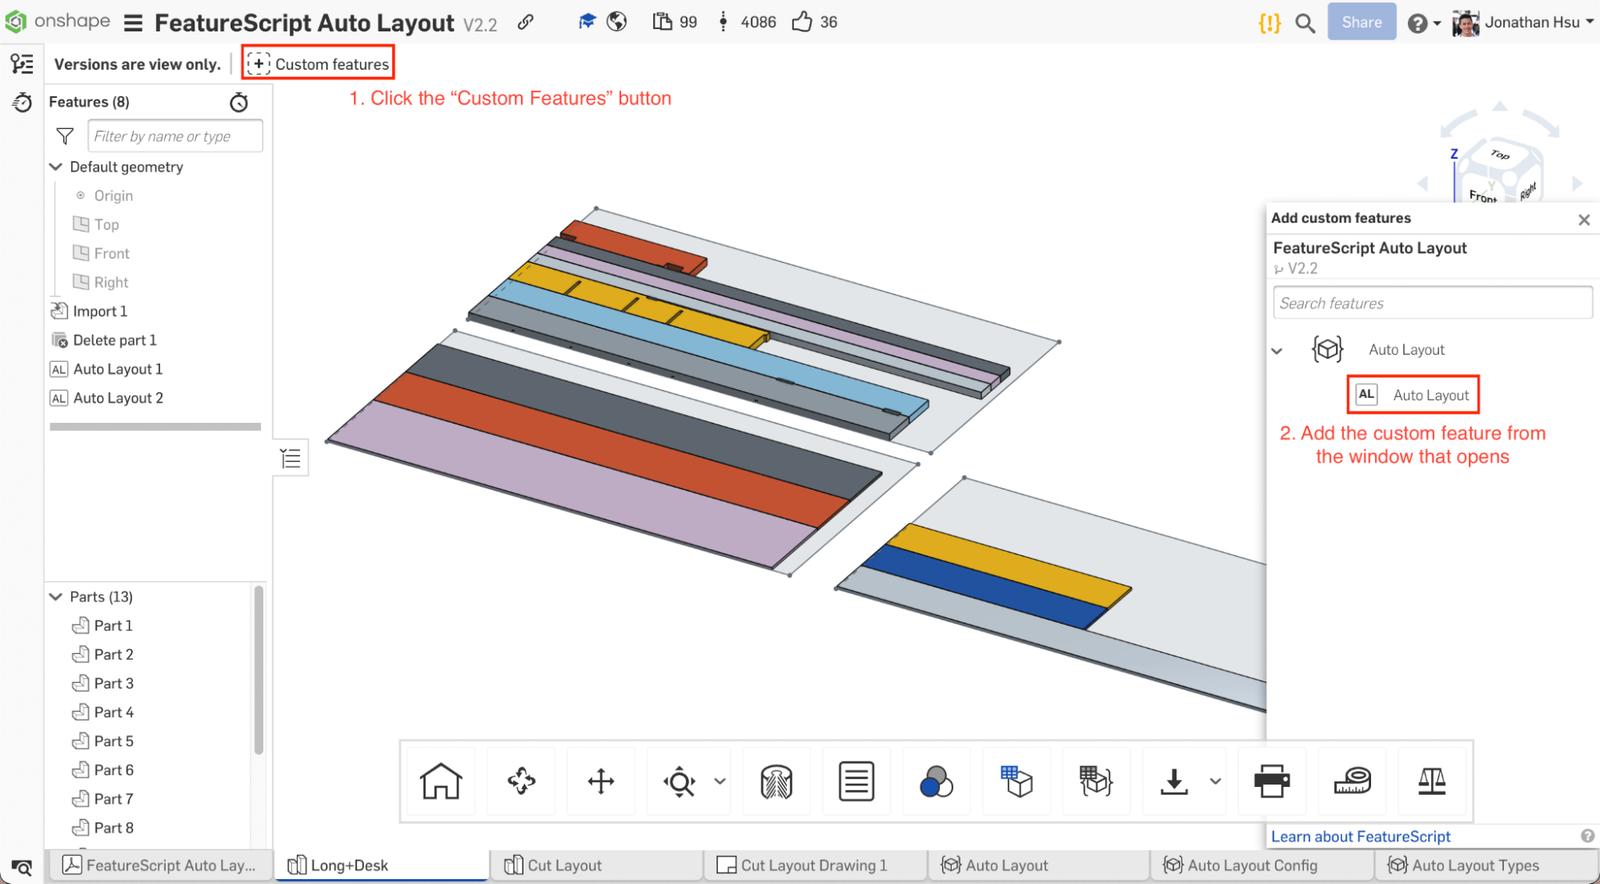
In the toolbar of any Onshape Document containing a Feature Studio, you will find a button that allows you to add that Custom Feature to your toolbar. In your own documents, you can then use the Custom Feature from the dropdown menu in the top right.
The Custom Feature dropdown in a separate Onshape Document.
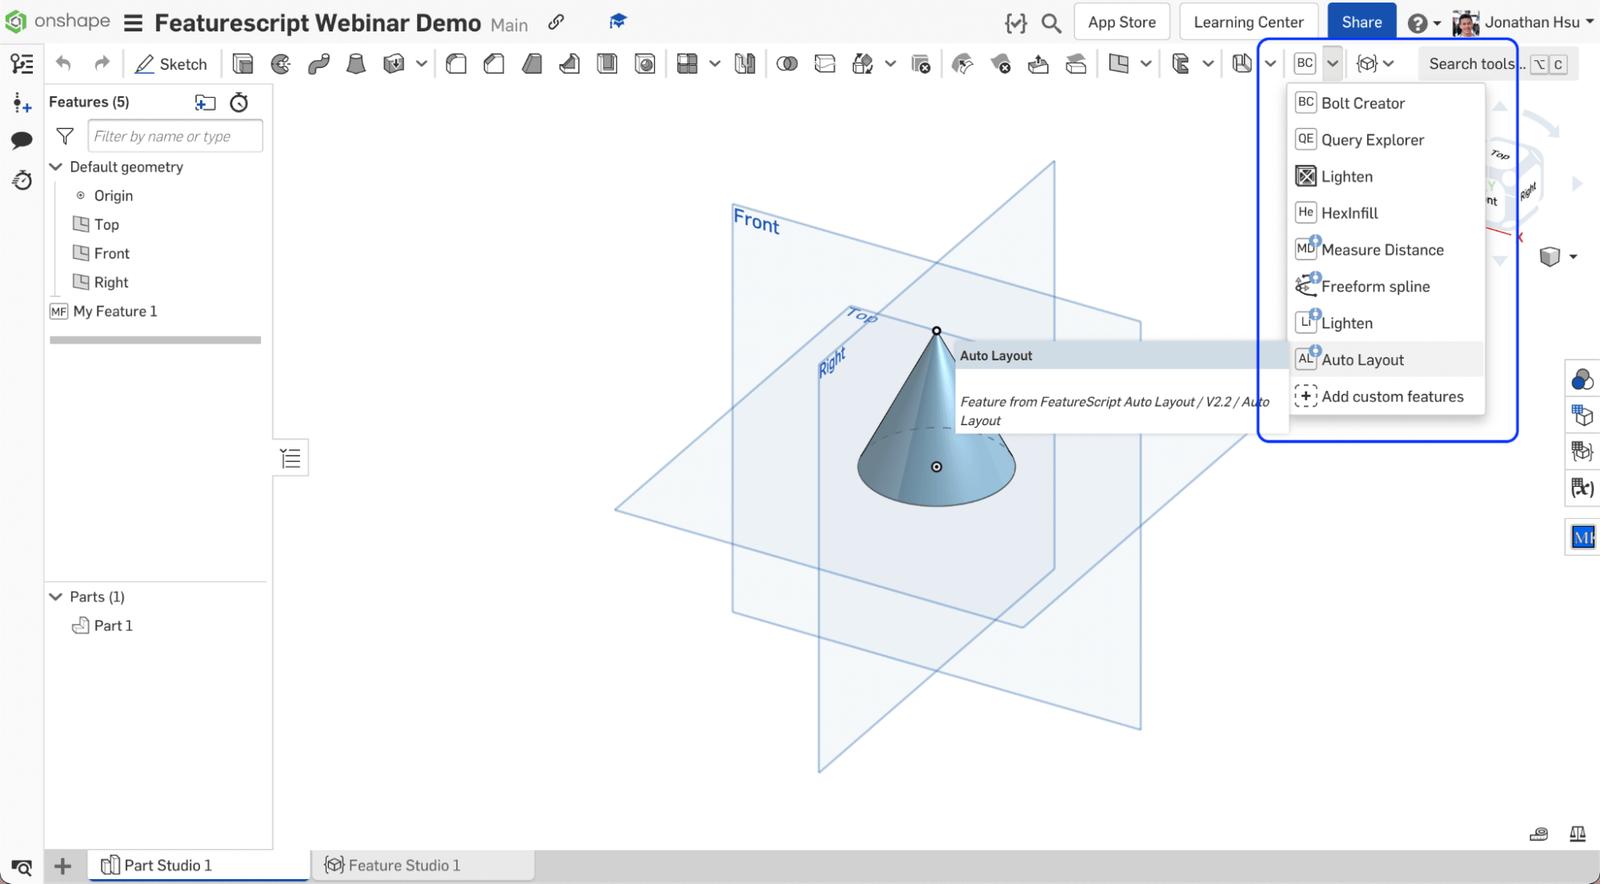
You can find community-made Custom Features by searching in the menu that comes up when adding a Custom Feature within an Onshape Document or by browsing through some of the curated lists that have been published:
2. Using Custom Features in Education and Manufacturing
When starting on any design task, it’s a good idea to keep track of what operations might create a workflow bottleneck. It might take a while for you to create or import all of the different fasteners needed for an assembly, or to weight-relief each part individually.
For educators, a different set of challenges may arise when getting students started with using some of the fabrication tools in the classroom, as this usually means walking the class through the process of setting up their files for 3D-printing or laser-cutting.
For these scenarios and many more like them, using Custom Features to your advantage can help drastically reduce the time needed to complete these tasks. An example of this would be the often tedious task of laying out parts for cutting on CNC machines such as laser-cutters or waterjets. These tools often run on software that will only accept DXF files, in which the user has to lay out their parts in an efficient way to conserve materials. In a classroom environment, this might mean teaching students how to use yet another piece of new software.
An explanation of the Auto Layout Custom Feature.
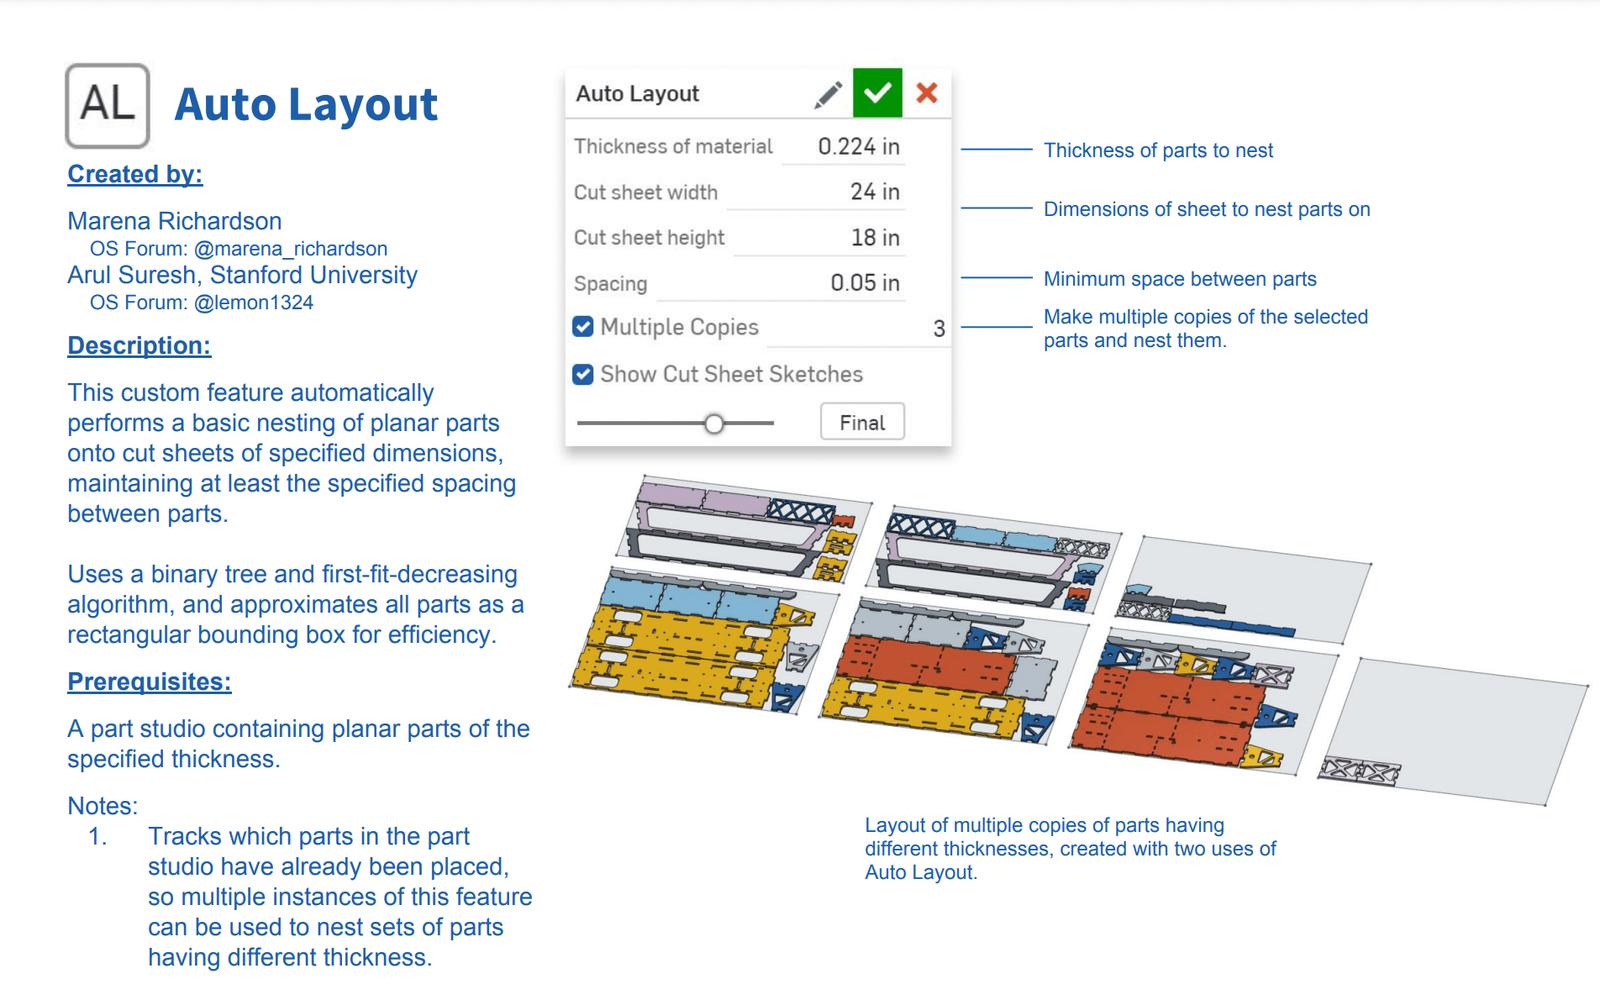
With the Auto Layout FeatureScript, the layout of parts onto a predefined rectangular area can be automated. This Custom Feature turns what is often a half-hour of careful positioning of parts into just a matter of selecting parts and having the custom feature place them into the area that is defined by the user. From there, a DXF file can be directly exported for use in manufacturing.
An explanation of the Lighten Custom Feature.
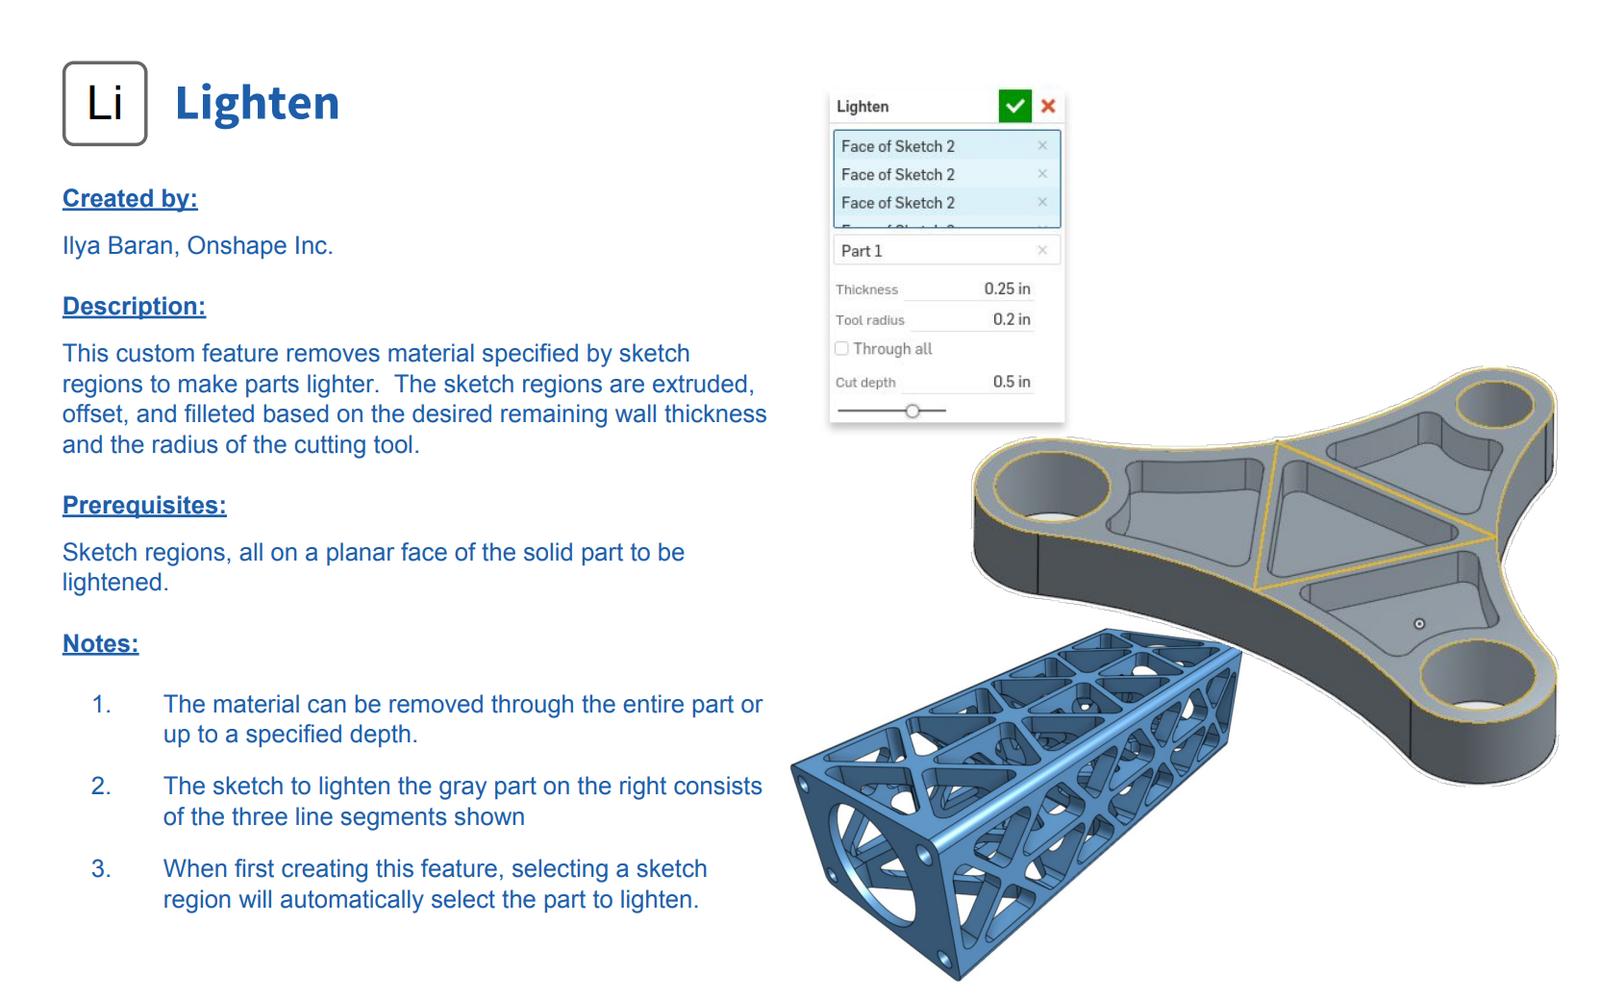
Streamlining the design process when creating large projects can help greatly reduce the time it takes to go from the part-design stage towards assembly. Many different programs and competitions often require participants to create components with their part weight in mind. This leads to large amounts of time spent performing weight relief on each part.
The Lighten Custom Feature transforms simple sketches into fully defined weight relief, with access to options such as wall thickness and profile selection presented in a simple UI menu.
Repetitive tasks such as defining wall widths and extrusion depths for weight relief can seem simple at a glance, however, the time needed for these tasks can quickly add up over the course of a large assembly. Dozens of parts that each require their own weight relief patterns are often involved over the course of a large project. By using Custom Features to aid in their design process, the time that the designer spends on each weight relief pattern can be dedicated to other parts of the project.
For more helpful Custom Features and tips to help with your manufacturing workflows, check out this webinar on Design for Manufacturing in Your Classroom.
3. Learning Resources for FeatureScript
Onshape has published some fantastic resources for anyone interested in learning FeatureScript in order to implement Custom Features of their own.
To get started, head over to the FeatureScript Documentation site to learn more about the FeatureScript programming language as a whole. For instructors and anyone else looking for more formal training, a FeatureScript Fundamentals course is available in the Onshape Learning Center. This course is a self-paced set of videos and examples to help you develop those FeatureScript skills.
A background in programming is not required as the course provides a great baseline understanding of necessary programming concepts.
The addition of Custom Features in Onshape allows for all users to tailor their CAD experience to their own needs. Onshape provides the unique opportunity to design not only using 3D tools, but with FeatureScript to aid in your workflow.
Onshape for Education
Get started with Onshape and join millions of students and educators worldwide.
Latest Content

- Case Study
- Automotive & Transportation
Zero Crashes, Limitless Collaboration, One Connected Workflow With Cloud-Native Onshape
12.04.2025 learn more
- Blog
- Becoming an Expert
- Assemblies
- Simulation
Mastering Kinematics: A Deeper Dive into Onshape Assemblies, Mates, and Simulation
12.11.2025 learn more
- Blog
- Evaluating Onshape
- Learning Center
AI in CAD: How Onshape Makes Intelligence Part of Your Daily Workflow
12.10.2025 learn more
- Blog
- Evaluating Onshape
- Assemblies
- Drawings
- Features
- Parts
- Sketches
- Branching & Merging
- Release Management
- Documents
- Collaboration
Onshape Explained: 17 Features That Define Cloud-Native CAD
12.05.2025 learn more


