Everyone should learn how to code.
Just a few decades ago, coding was an obscure activity practiced only by a handful of expert scientists and researchers. Now, nearly a quarter of the way through the 21st century, coding is integrated into our daily lives in ways that are profound and sometimes surprising.
Look around and it is difficult to find someone without a powerful computer in their pocket or wrist. Beyond that, computing devices run our cars, our toys, and even our homes.
Learning the language of these devices ensures that you are not simply a passive user of modern technology but are able to engage with it and manipulate it.
With just a few coding skills, you can add personal automations to your smart devices or write scripts to help with your taxes. Of course, coding skills also open a world of career opportunities. Even more generally, practicing coding engages your brain in logical thinking and problem solving – important practices for anyone, young or old.
Coding Activities for Beginners
For all of the reasons above, the Hour of Code has been a popular coding activity for beginners in schools for nearly a decade. The goal of the Hour of Code is to demystify the concept of coding and to promote the idea that anyone – yes, anyone – can code.
Coding need not be scary or intimidating or relegated only to upper-level high school classes. Kids can truly start coding even before they are reading.
Since its inception in 2013, the Hour of Code has evolved into a worldwide grass-roots effort to celebrate coding and to encourage all students, particularly those intimidated by technology, to dip their toes into this exciting and growing world.
Educators and partners have developed thousands of activities to introduce the fundamental concepts of coding, enabling students of all ages to learn coding basics and succeed in a field that might have otherwise felt mysterious or daunting.
The goal is to pull the curtain back and show students that coding is little more than learning how to communicate carefully and logically. Once students understand the basics, look out – their imaginations usually do the rest.
An Integral Tool for STEAM Classrooms
If you are looking for a fun, engaging, rewarding, and scalable Hour of Code activity for your students, look no further than Onshape.
Many people know of Onshape as a state-of-the-art professional CAD package. Beyond that, it is the perfect tool for integrating design, collaboration, and coding into your classroom. Teachers can use Onshape to teach physics, electronics, geometry, calculus, and more. Onshape is a central tool for any STEAM classroom.
Remarkably, this professional-grade design platform is free to students and educators. Click the button below to sign up for your free education account and start designing and coding today.
If you’re new to CAD or Onshape, you’ll want to check out the free resources in our Learning Center. In particular, our Intro to CAD course is a complete CAD curriculum built by teachers for teachers. There are also courses on running a class with Onshape as well as more advanced courses diving into Onshape’s native programming language, FeatureScript.
Once you’re all set with Onshape, now’s the perfect time to ramp up your coding lessons. Here’s where to start.
Coding with Onshape: The Basics
One of the most fundamental concepts in coding is a variable. A variable is simply a character or word that stands for something else. And it can vary. Let’s introduce this concept in Onshape in a way that has a quick visual impact.
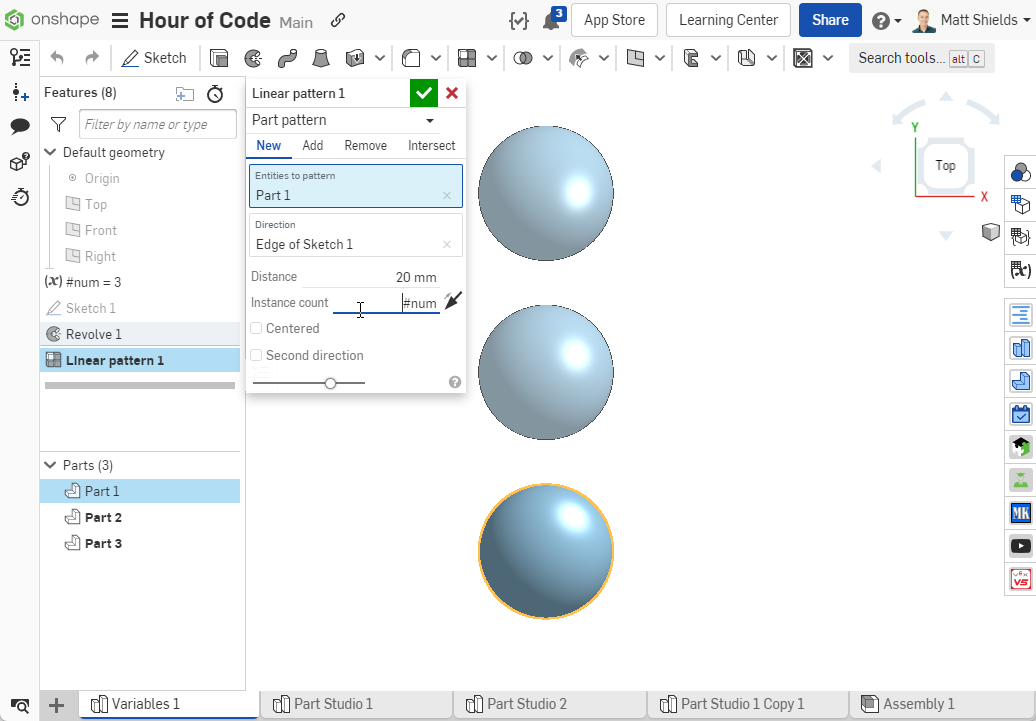
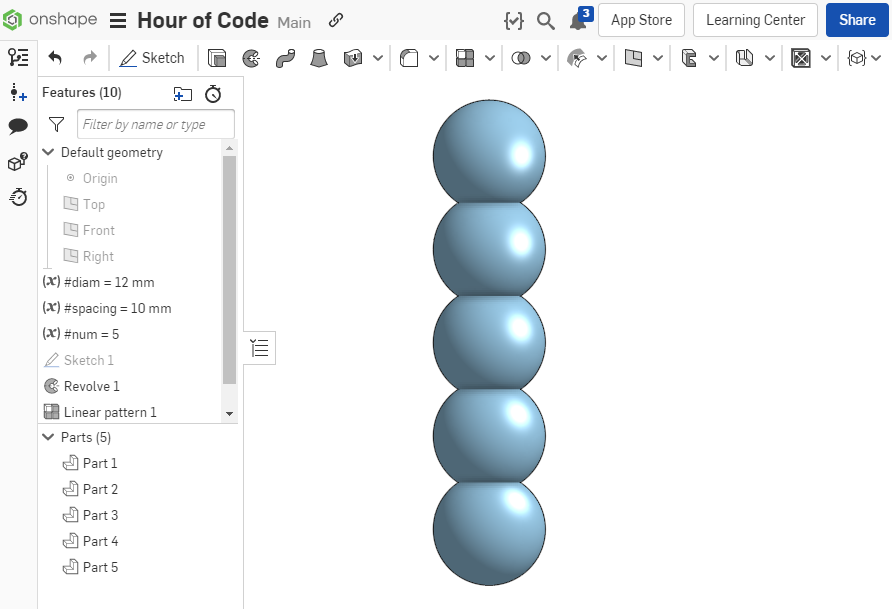
In the Part Studio above, we created a simple sphere (this could be any part). We also created a variable called “num.”
In Onshape, all variables are preceded by the “#” character. Then we used that variable to determine how many times the part was patterned. Change the variable and the pattern updates. That’s coding!
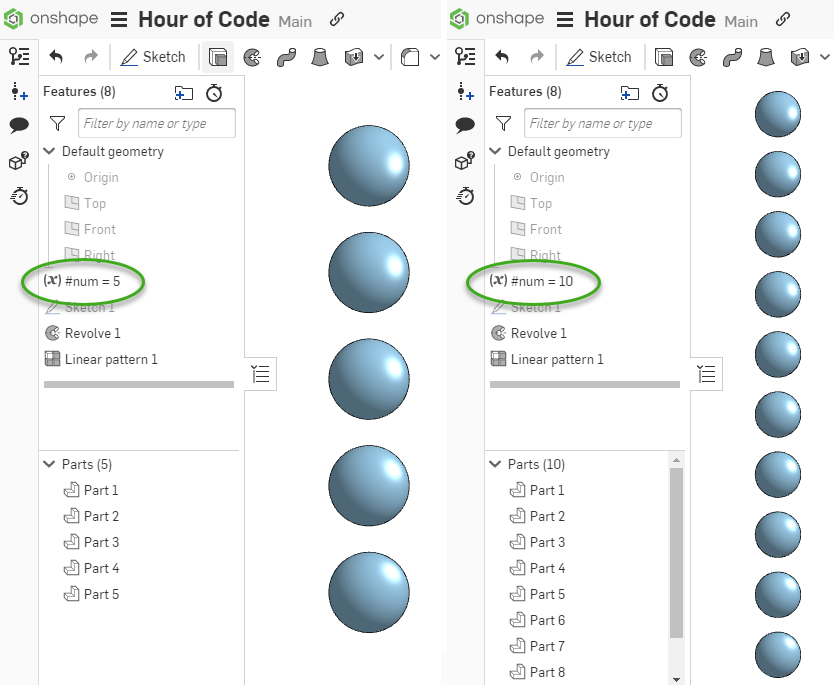
A basic Hour of Code activity could encourage students to see what Onshape features they can control with variables. For example, the model above could be expanded to include variables for the sphere diameter and the pattern spacing. See below.
More with Variables
If students already have a grasp of the concept of variables, let’s try a couple of more advanced activities.
In the picture below, a square plate has a pattern of holes in it. The size of the plate, the hole diameter, and the number of holes are all driven by variables. The final variable, #spacing, is computed from the other variables.
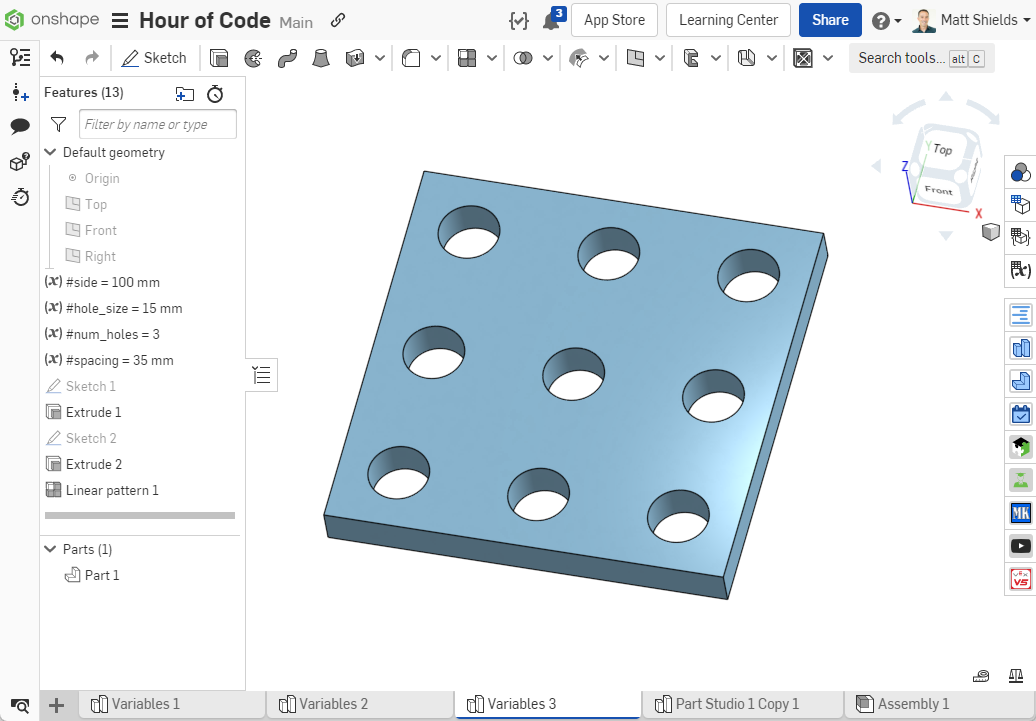
First, challenge students to calculate on scratch paper the spacing between the holes based on the square plate’s size, the hole size, and the number of holes. Then see if they can type that variable into Onshape.
Spoiler alert: For the spacing, we used this code:
(#side-2*#hole_size)/(#num_holes-1)
It works for any combination of variables.
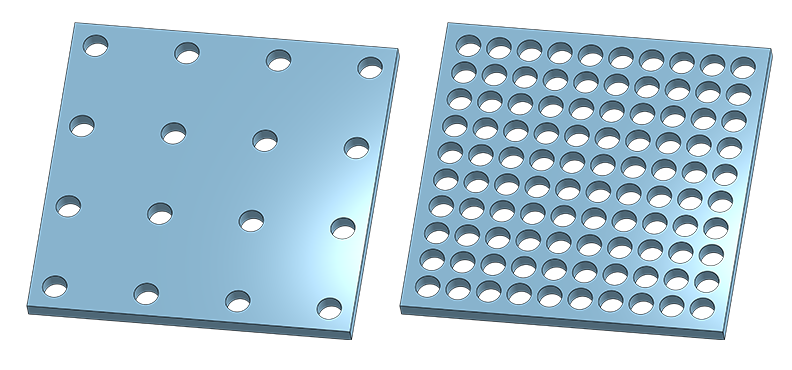
An alternative to this challenge would be to have students calculate the number of holes, given the plate size, the hole size, and the spacing. Since the number of holes must be an integer, students can use the round() function. For example, the variable #num_holes could be round((#side-#spacing)/#spacing).
FeatureScript and Creating Custom Features
Ready to take Onshape and coding to the next level? You might not know that Onshape actually is built on its own coding language called FeatureScript and has a powerful coding environment built right into the product. Let’s dive in.
In the animation below, we are writing our first FeatureScript. Here’s how:
-
Click the plus sign at the bottom-left in Onshape and select “Create Feature Studio.” You are now writing a Custom Feature called “My Feature.”
-
Select “New feature.” This will add the necessary code to start your new Custom Feature.
-
In the parameter section, use the Feature Parameters menu to add a “count parameter.” You can just leave it called myCount.
-
In the action section, just type println(definition.myCount * 13);
-
That’s it, you just created a Custom Feature! Click the Commit button to save your feature.
-
Now go to any Part Studio and select the “Custom Features in this Workspace” button,
 .
. -
Click “My Feature.” That will add it to the Part Studio.
-
Open your FeatureScript Notices window
 .
. -
You should see a number at the bottom of the screen. That was generated by the println() function. Click the up and down arrows on your keyboard to change the “My Count” variable and see the number at the bottom of the screen update.
-
You’re programming in Onshape!
In the above example, you were able to write code that took in user input and gave you some output. That’s the basics of coding. Expanding on the example, adding different inputs and outputs, would be easy.
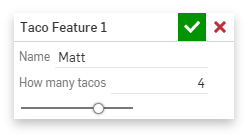
Let’s do one more example, this time with some visual output. With just 20 lines of code (almost all of it written for you by Onshape), you can create an interface that asks how many tiles you want and then generates them.
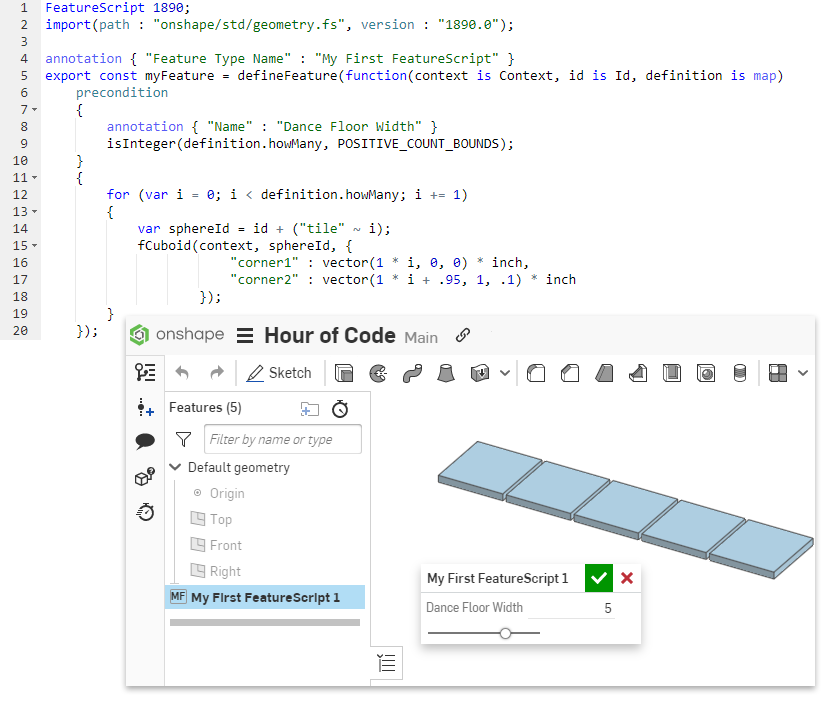
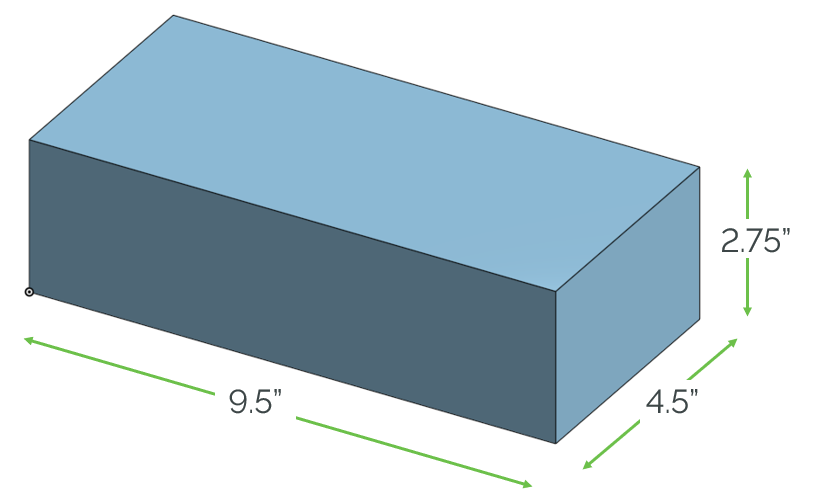
In the example above, we just add two things. First, we added a “for loop,” a basic and important coding concept. And we took advantage of the fCuboid() function in Onshape. Just like before, we had Onshape write most of that code for us. We just selected “fCuboid” from the Operation Functions menu. Then making a cuboid just requires you to input two 3D vectors that specify the opposite corners of your shape. For example, this code:
"corner1" : vector(0, 0, 0) * inch,
"corner2" : vector(9.5, 4.5, 2.75) * inch
...would make a brick with one corner on the origin.
Finally, we can add a little bit of logic and take advantage of the setProperty() function and we have a dance floor. We also utilized a favorite piece of coding shorthand called a ternary operator.
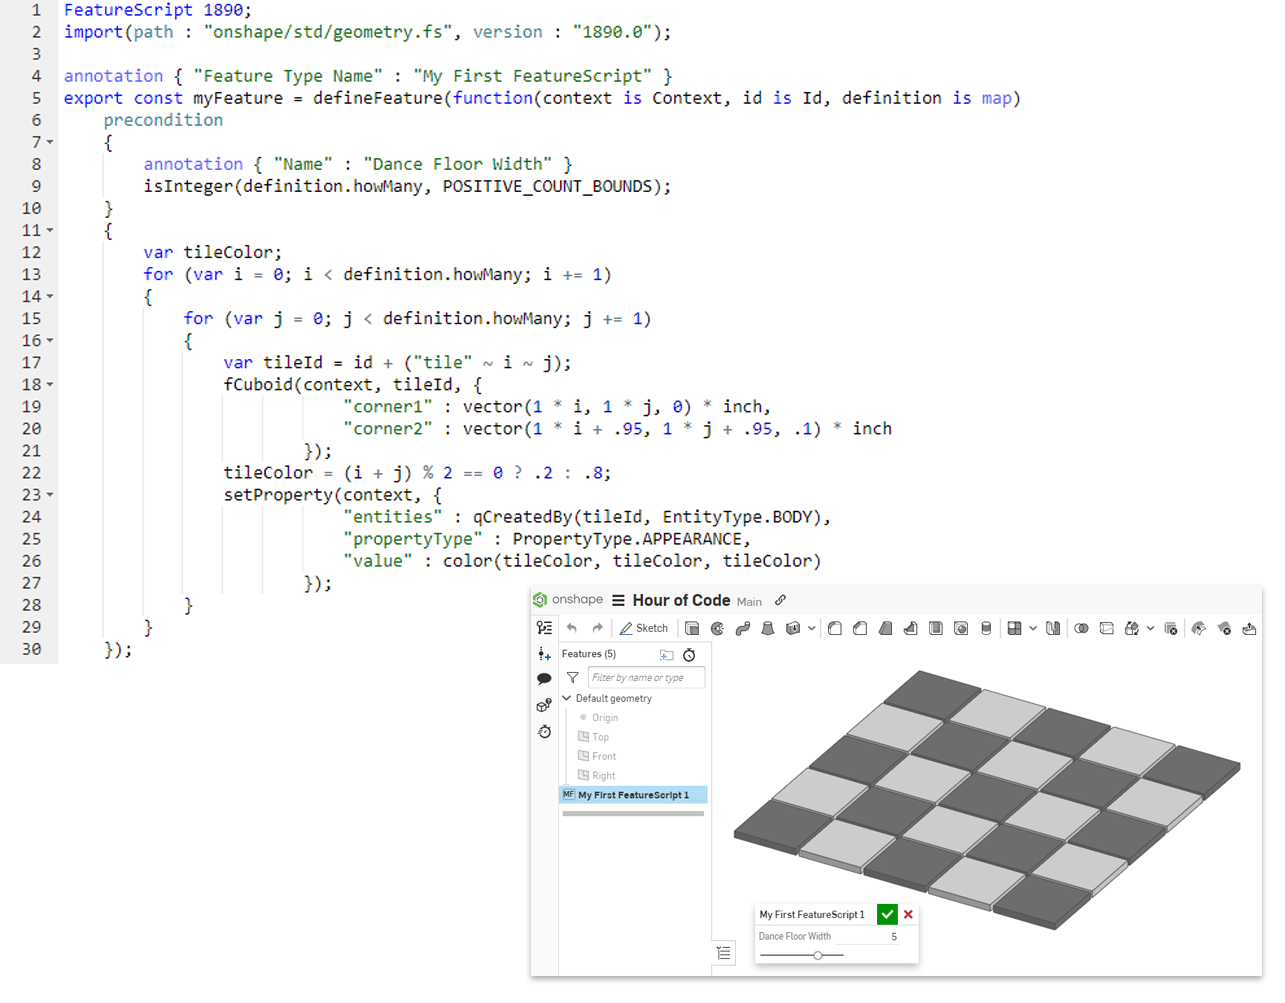
Who’s ready for a coding dance party?
Get Started with Onshape Education
Onshape for education brings CAD out of the computer lab and into the modern era.


